Overview
Logging In
Website: https://ticket.flemingc.on.ca
Username: Fleming email address (firstname.lastname@flemingcollege.ca)
Password: Fleming password
Navigating
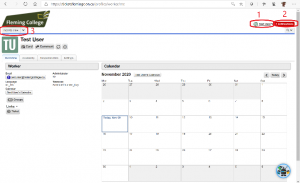
- Click this drop down to logoff</span
- Read Notifications – Notifications are alerts you receive when using the ticket system.
- “Records view” – Click here to access your tickets
Viewing Tickets
To access your tickets, click on the “records view” tab, #3 above
- “My Tickets”– This tab allows you to view all tickets that have been assigned to you
- Past Due tickets– This “worklist” has all your overdue tickets
- Open tickets – All your open and in progress tickets
- Watching – Tickets you are watching. You don’t need to be the “owner” to be a watcher
- Closed tickets – All your closed tickets
Working on a ticket
Click the ticket subject to view the contents of a ticket
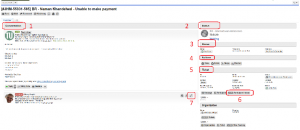
- Ticket Conversation – All communication to and from the ticket
- Ticket Status – Tickets can be one of the below statuses:
- Open – Ticket is open and waiting for a response
- Waiting for reply – Ticket is open, however
- Closed – Ticket has been completed
- Deleted – Ticket has been deleted
- Owner – Current owner/worker assigned to the ticket
- Actions
- Close – Clicking this button will close the ticket
- Delete – Clicking this button will delete the ticket
- Merge – Allows you to merge multiple tickets into one ticket
- Read all – Expands all emails messages in the “Conversation” window
- Ticket info
- ID – This is the ticket ID. Also known as the ticket number
- Mask – Unique ticket mask for the ticket
- Group – Division/Department the ticket is assigned
- Bucket – Bucket the ticket is assigned to
- Hard due date – Date ticket should be completed by
- Owner – Current ticket owner
- Participant History
- Clicking this icon will expand the email
Workflow
Ticket System – Processing
Daily morning review
- Login to ticket system – https://ticket.flemingc.on.ca
- Navigate to “records view” worksheet
- Review “My past due tickets”
- Reply to requester with latest update
- Update ticket with comment if needed
- Update “hard due date” if needed
- Review notifications
- Click “Notifications” in top right of page
- Review each ticket notification and update ticket as needed
- Review open tickets
- Review tickets that are currently set to status “Open”
- Review tickets that are currently set to status “Waiting for reply”. Look for this icon to indicate ticket is set to “Waiting for reply”:
- If student hasn’t replied within 2 days, reply with a follow-up message
- You may also call student and add a comment to the ticket as needed
- If student, has already been sent multiple requests for follow-up, reply that you are closing the ticket as you haven’t heard from them. Close ticket
- Review tickets in “Dispatch”
- Starting with oldest tickets, click on ticket subject
- Click “Edit”
- Set yourself as owner
- Update ticket subject
- Set appropriate group and bucket
- Review participants and make sure updates aren’t required
- Review hard-due date and update if needed
- Save changes
Updating a ticket
- Click ticket subject to open ticket
- Confirm ticket is in appropriate group/bucket
- Update ticket owner if required
- Replying to ticket
- Transferring to another user/division
- Update group/bucket if needed
- Clear/Set owner field
- Add a comment identifying what is needed and what has been done
Closing a ticket
- Click ticket subject to open ticket
- Reply to student what has been done to solve their problem/request
- Set ticket status to “Closed”
- Verify group and bucket are set properly
- Verify owner is set properly
Creating a ticket
- Click “+” on one of the ticket grouping sections
- Set From: to appropriate group/bucket
- Set “To:” to student/requesters email address
- Enter details in message body
- Set owner (not required if placing in “inbox”)
- Set “hard due date” – if unsure set to “+2 days”
- Click “Send message”
Advanced Use
Searching in the ticket system
Searching for content in the ticket system is performed by clicking the search icon in the top right of the screen. Below are examples of search terms you can use. Syntax case is important so be sure to use all lower case for the query name.
Searching by ticket ID:
id:ticket id (eg. id:17345)
Searching by ticket mask:
mask:ABC-12345-123
Searching by participant/customer:
participant:email address
participant:jane.doe@flemingcollege.ca
Searching by subject:
subject:Item to search for
subject:“transcript request”
Searching by dates
created:date
created:”Nov 1 2020 to Nov 15 2020″
closed:date
closed:today
Search by ticket status:
status:[o,w]
status:Open
Ticket status can be one of the following:
o – Open
w – Waiting for reply
c – Closed
HTML Emails
- Create new ticket or reply to current one
- Confirm if you are replying in text or html format
- If you see the
 icon, click on it to change to HTML format (markdown)
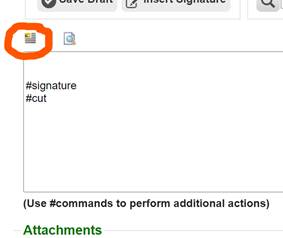
- The menu should appear as below
- Type your email
- Highlight where you would like the hyperlink set
- Click the
 icon or hit “C-L”
- Type the URL
- Click OK