Overview
Any Teams meeting or call can be recorded for future viewing. The recording captures audio, video, and screen sharing activity, and you can share it securely across your organization.
A recording will expire and be automatically deleted after a set period of time. The length of time it’s available is set by your admin, but you can change the expiration date of any given recording. For more info, see Manage the expiration of a meeting recording.
Notes:
- Meeting recordings won’t capture whiteboards, annotations, shared notes, and also won’t include videos or animations embedded in PowerPoint Live presentations.
- When you view a meeting recording, you’ll see no more than four peoples’ video streams at once.
Start recording
When you start recording a meeting, you also turn on live transcriptions
- Start or join the meeting.
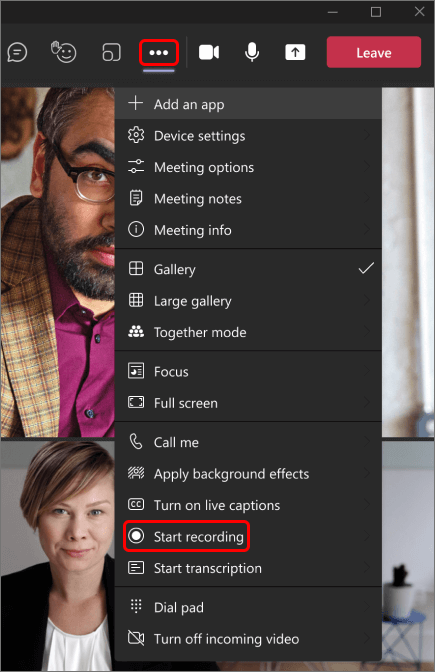 Go to the meeting controls and select More actions
  > Start recording.Everyone in the meeting gets notified that recording and transcription have started.
Notes:
- You can’t make multiple recordings of the same meeting at the same time. If one person starts recording a meeting, that recording will be stored on the cloud and available to all participants.
- Meeting participants have the option of viewing the transcription during the meeting. For details, see view live transcription.
Stop recording
- Go to the meeting controls and select More actions .
- Choose one of the following:
- Stop recording: Stops the recording and live transcription.
- Stop transcription: Stops just the live transcription. The recording continues until you select Stop recording.
Find recordings
Recordings are available in different places depending on the type of meeting.
- The recording is processed and saved to SharePoint if it was a channel meeting or OneDrive if it was any other type of meeting.
- The meeting recording shows up in the meeting chat or channel conversation (if you’re meeting in a channel).
Note: For now, guests and external attendees can view the recording only if it’s explicitly shared with them.
| TYPE OF USER |
CAN START RECORDING? |
CAN STOP RECORDING? |
| Meeting organizer |
|
|
| Person from same org |
|
|
| Person from another org or company |
|
|
| Guest |
|
|
| Anonymous |
|
|
Notes:
- Recording continues even if the person who started the recording has left the meeting.
- The recording stops automatically once everyone leaves the meeting. If someone forgets to leave, the recording automatically ends after four hours.
- If one of the participants has a policy for compliance recording, the meeting will be recorded according to the policy even if that participant is from another org.
Notice of Recording
Participants must be made aware of any recording and the rationale for the recording. The host of the video conferencing session must provide participants with a notice of collection in advance of the session. The following notice should be posted in D2L, on the course outline for courses that are delivered remotely, in the meeting invite, and in the meeting chat so that it is available for the entire session.
This synchronous session is being recorded. As a result, your image, voice, name, personal views and opinions, and course work may be collected under legal authority of section 2 of the Ontario Colleges of Applied Arts and Technology Act, 2002. This information will be used for the purpose of supporting student learning. Any questions about this collection can be directed to the Privacy and Policy Officer at freedomofinformation@flemingcollege.ca or by mail to 599 Brealey Drive, Peterborough, ON K9J 7B1.
Faculty may use the following PDF or PowerPoint slide containing the “Notice of Recording” when recording synchronous learning sessions and in course material, as needed.
Notice of Recording Teaching - PDF
Notice of Recording Teaching - PPT
Faculty, staff, and administrators may use the following PDF or PowerPoint slide containing the “Notice of Recording” when recording meetings and PD sessions.
Notice of Recording - Working - PDF
Notice of Recording - Working PPT